Buttons and acrilic gadgets
Instructions
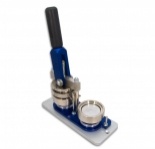
PB500 press
TYPE 500 PRESS - Instructions for Making Button Pins
The matrixes have markings (grooves) that allow for correct alignment of the print and pin. They can be rotated. To make a button pin using thick paper (thin cardboard, foil, photograph, etc.), cut a disc the same diameter as the badge. The edges of the pin will be "wrapped" in foil.
1. Print and cut out the appropriate number of paper discs (for stamps with a diameter of 56 mm, cut a 66 mm disc: a maximum of 11 discs can fit on one A4 page)
2. On the matrix marked "1," place the cover (edge down), the cut-out printout, and the foil disc, in this order.
3. Turn the table counterclockwise until it stops.
4. Press the lever all the way down (not too hard).
5. Place the bottom of the stamp on matrix "2," with the safety pin facing down.
6. Turn the table again.
7. Press the lever (a little harder; you can now place the next cover, paper, and foil on matrix "1").
8. Remove the finished stamp.